
This post may contain affiliate links so I earn a commission. Please read my disclosure for more info.
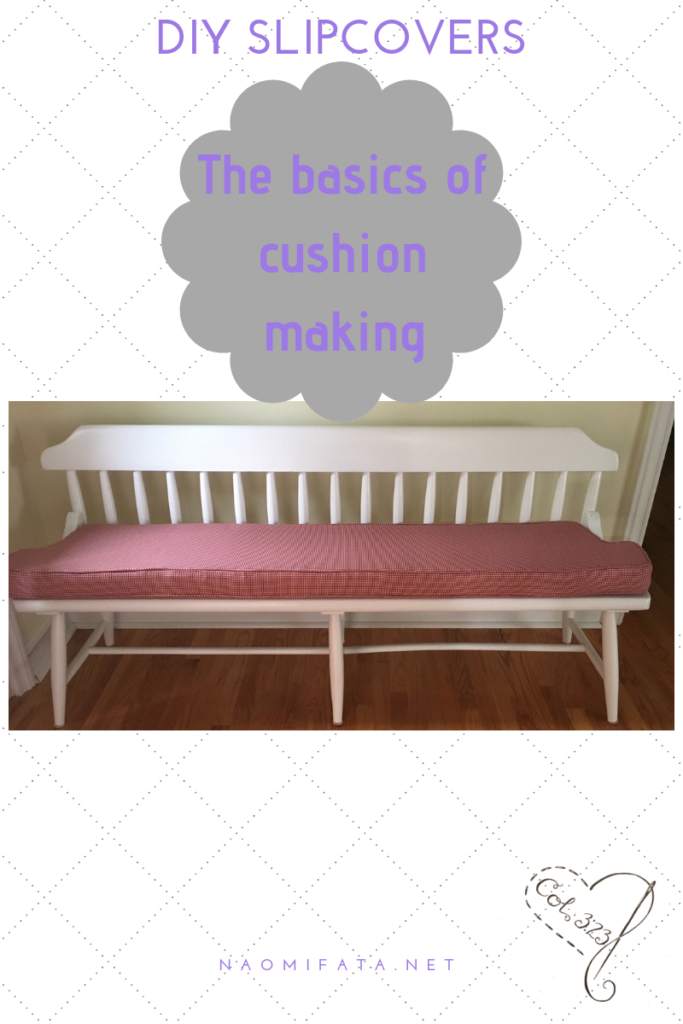
Everyone enjoys sitting on their favorite spot enjoying the sights and sounds of their surroundings. If you have a bench that you like to hang out on, wouldn’t it be so much better if it was covered with a cozy, soft, and beautiful bench cushion? The hard wood of a bare bench can be hard on your body. It tends to compress your hips, misalign your pelvis and spine, and forces you to either lounge or slouch. A bench cushion, however, can solve all these problems.
Adding a bench cushion in a fabric of your choice not only solves discomfort issues, it also turns your space into a more exciting and inviting place for you and your guests.
A simple addition like a bench cushion will

Slipcovers can be a beautiful way to enhance your home. Check out some of my projects for your own slipcover inspiration.
1.Make your space look harmonious and well put together.
With the freedom to pick the colors, texture, and other décor elements, you can make the space an extension of your style.
2. Meet your standards because you choose the size and shape of your cushion
This means that you’ll have the freedom to pick a comfortable, high quality cushion that fits within your home improvement budget.
3.Allow you to experiment with different fabrics.
Choosing a bench cushion doesn’t just end there, you can opt to add throw pillows in different colors, textures, and patterns. This allows you to experiment with different fabrics and perhaps make use of scraps from other projects.

4.Complement your arrangement and add dimension to your home decor.
With the freedom to choose different fabrics, shapes, and additional décor items like throw blankets, you can add interest to your home’s interior design theme without breaking the bank.
5.Let you enjoy your space regardless of whether you are renting or whether you own the home.
Bench cushions are renter friendly, and you can play around with ideas to make your space fit your personality and style.
With all these benefits, owning a bench cushion is a great investment. A custom made cushion is a better investment because it is less expensive, you can choose your own thickness and quality of the foam, and you can select a fabric that goes with the theme of your house décor. For more on how to save money on slipcover fabric check out this post.
How to Make Your Own Cushion
Part 1: The cushion
Step 1: make a template of the shape of the bench using old sheets.
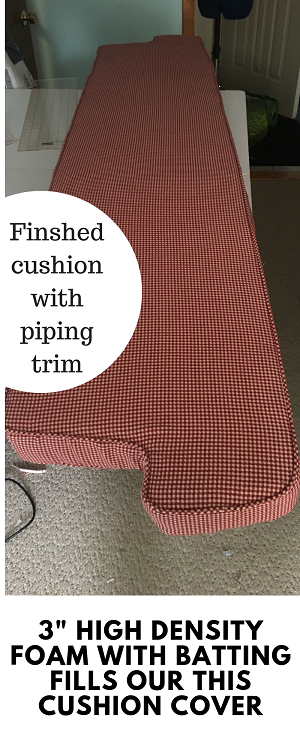
Step 2: lay the template on the cushion of your choice. I used a piece of 3″ high density foam.

Step 3: Using an electric turkey knife, cut out the shape of the cushion.
With the foam cut to size, you are ready to make a cushion cover, but not before you cover the foam with upholstery batting. Use spray adhesive to cover the foam with upholstery batting.
Part 2: How to Make a Cushion Cover
Step 1: take the measurements for your cushion
Measure the width of the bench from the back of the bench to the front, and add an inch for sewing.
Measure the length of the bench by placing the tape measure along the length of the back of the bench. And add an inch for sewing.
Tip: always measure twice to avoid getting your measurements wrong
Step 2: Cut the facing
Start by cutting the facing of the cushion. Use the measurements you have taken from the bench and don’t forget to add the inch for sewing allowance (half an inch on either end).
Measure the width of the facing and add a total of 5 inches for zip length.
Measure from the center of the width of the facing to the end, then from the end to the start of the zip to get your boarder measurement. Please note that the boarder of a box cushion is usually longer than the full width of the fabric.
The zip is half the height of the boarder plus 1 ¼ inches for sewing and zip allowance.
Trace the cutting of the facing on your upholstery fabric and cut out an identical piece of fabric for the second facing.
Step 3: Cut the boarder
Measure and cut the width and length of the boarder.
Step 4: Cut your zipper boarders
Step 5: Cut side pieces.
Step 6: Cut piping
On the cross section of the fabric, measure 4 ½ cm wide strips. ½ cm is for sewing allowance. You’ll need 3 lengths of piping per cushion.
Step 7: sew the piping
Lay one strip of fabric atop another and sew across at the end of the strip to make one long strip. Cut the excess fabric off.
Take a 5 ml piping cord and place it under a piping foot with the fabric beneath it. Fabric should be facing wrong side up. Tightly close up the fabric to make the piping.
Sew using an overlocker to prevent the fabric from fraying and cut the fabric down to ½ an inch.
Step 8:Attach the piping to the cushion cover
Place the piping on the facing of the cushion with the right side of the cushion facing up. Sew across the length of the cushion facing.
When you get to the edge of the facing, cut about ½ an inch away from the edge without cutting the piping. Turn the piping and the fabric and attach the piping along the edge of the facing. Interlock the piping edges so that the piping flawlessly goes around the facing.
Repeat this step for the second facing.
Step 9: Make the zipper boarders
Take ¾ inch of the zip boarder fabric, fold it, and attach it to the zip make sure the fabric is straight. Take the second piece of the boarder fabric, fold it, and attach it to the other side of the zip. Make sure the zip and the fabric are straight underneath the fabric. The two pieces of fabric attached to the zip should be about 4 ½ inches wide.
Step 10: with the right side of the facing the right side of the boarder, attach all the pieces making sure that the fabric aligns. Join the zip boarder to the rest of the boarder and sew all round, ensuring that the edges are aligned.
Check your cushion cover to make sure all the covers align and the fabric is facing the right side.
Step 11: insert the fabric into the cushion cover and place it on your bench. You have your own custom bench cushion.
In the video above you will also notice I am using some of my favority sewing tools like my electric rotary cutter and quilters ruler.
Other supplies necessary for this project is cotton cording for the welting/piping and a length of zipper chain that can be cut to size.
For more info on how to make bias strips for the piping read my article on pillow making.
And don’t miss out on your free gift, a 16 page ebook on slipcovers.
Virtual Sewing Classes


PDF TUTORIALS
-
 Beginner Mending and Alterations for the Home$20.00
 -
3 Textiles Lessons Your Kids will love for your homeschool$12.00
-
Create a Boxed Pillow with this Step-by-Step Tutorial$8.00
-
Master the Basics of Your Sewing Machine – Tips for Beginners$5.00
-
How to Repair Elastic Waist – Easy Steps!$8.00
-
How to make the waist of jeans smaller with darts$4.00
-
How to Replace a Jacket Zipper PDF Tutorial$6.00
-
How to Shorten Jacket Sleeves Tutorial$4.00
-
How to Alter a Coat Tutorial$6.00


